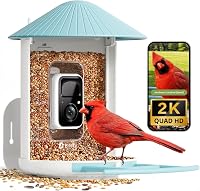
How to Clean a Smart Bird Feeder
Here's how to clean Bird Buddy: discard old seed, protect the camera, and wash only approved parts using Bird Buddy's care instructions. Follow its disinfection directions, then dry everything fully before reassembly and refilling.
On this page (9 sections)
- How do you clean a Bird Buddy smart bird feeder?
- What should you remove before cleaning?
- How do you protect the camera and solar roof?
- How do you clean the seed tray and perch?
- How often should you clean a Bird Buddy?
- Which smart feeder fits your cleaning routine?
- What cleaning mistakes should you avoid?
- How do you dry and reassemble the feeder?
- What's the best decision for cleaning Bird Buddy?
Here's how to clean Bird Buddy: discard old seed, protect the camera, and wash only approved parts using Bird Buddy's care instructions. Follow its disinfection directions, then let everything dry fully before refilling.
The main job is removing seed residue and droppings without getting water into electronics. A clean lens matters for pictures, but the feeding surfaces need equal attention.
How do you clean a Bird Buddy smart bird feeder?
Use a separate emptying, washing, disinfection, and drying routine rather than wiping the tray and adding more seed. Check your model's care instructions first because removable parts and permitted cleaners can differ.
Set aside enough time for drying before you start. Birds can visit again after the feeder is ready; there's no need to rush a damp feeder back outdoors.
How to clean Bird Buddy in the right order
- Take the feeder down safely. Stop using the camera and disconnect charging accessories as directed before handling washable parts.
- Empty the feeder completely. Put old seed, hulls, and loose debris in a trash bag rather than returning them to your seed supply.
- Separate approved parts. Follow the disassembly instructions and place electronics away from the sink.
- Remove stuck dirt. Wash permitted surfaces with approved soap and water, using a soft brush for corners.
- Disinfect as directed. Follow the approved product's dilution, contact time, and rinsing steps.
- Dry and rebuild. Check seams, reinstall parts correctly, and add fresh seed only when everything is dry.
Keep a brush and wash container reserved for feeder care. Wash your hands afterward and clean any work surface that held dirty feeder parts.
If you're arranging the feeder for the first time, our guide to setting up a bird feeder camera covers placement and connection steps.
What should you remove before cleaning?
Remove all seed and loose debris, then detach only the parts your model allows you to remove. Keep screws, seals, and brackets together in a small container.
Work over paper or a bin so dirty seed doesn't scatter around the yard. If the scoop touches spoiled seed, clean it before putting it back into your fresh supply.
Take a quick photo before disassembly if several parts fit together. It can help you check the orientation of a tray or bracket without forcing anything into place.
Don't pry apart sealed pieces or remove screws simply because they're visible. If a part resists, stop and check the instructions.
How do you protect the camera and solar roof?
Keep wash water away from the camera, charging port, and electrical connections. Weather resistance covers outdoor exposure under specified conditions, not every cleaning method.
Use the approved lens-cleaning method for dust or fingerprints. Avoid rough pads, scraping tools, and cleaner sprayed directly onto the camera.
Treat solar surfaces separately from seed-contact parts. Follow the panel's care directions, and don't use an abrasive brush to remove dirt.
Leave debris inside a charging port alone until you have the correct cleaning guidance. Our guide to charging a Bird Buddy explains the charging side of routine care.
How do you clean the seed tray and perch?
Focus on feeding surfaces, corners, and joints where waste collects. Remove loose material before washing so you can see any residue underneath.
Use a soft brush sized to reach narrow edges without scratching them. Pay attention to the underside of the perch and the point where the tray meets the feeder body.
Washing removes dirt, while disinfection serves a different purpose. Complete any required washing first so stuck material doesn't remain beneath the disinfectant.
Keep the surface wet for the specified contact time, then rinse as directed. Don't guess a stronger mixture or combine products to speed up the job.
Avoid household food-preparation areas where practical. If you use a shared sink, clean it afterward and keep feeder tools separate from dishes.
How often should you clean a Bird Buddy?
Follow Bird Buddy's cleaning schedule, with extra cleaning when seed or surfaces become wet or fouled. Inspect the feeder at each refill and after wet weather.
Check more often during busy feeding periods because hulls and droppings can build up quickly. A feeder that still holds seed may need cleaning before it needs refilling.
Remove wet, clumped, moldy, or fouled seed rather than covering it with a fresh layer. Use a smaller fill if seed regularly remains long enough to get damp.
Also check the ground beneath the feeder for discarded seed and debris. Easier access makes these checks more likely to happen, so use a reachable location when hanging or mounting a smart bird feeder.
Which smart feeder fits your cleaning routine?
Choose the feeder you can comfortably take down, empty, clean, and reinstall. Camera features matter less if the mounting position or disassembly process makes you delay care.
These are complete feeders, so replacing a working Bird Buddy isn't necessary just to clean it. The comparisons help if you're buying your first feeder or replacing one that doesn't suit your routine.
Bird Buddy Pro Solar: for buyers who want Bird Buddy features
The Bird Buddy Pro Solar suits buyers who want its app and 2K video in a solar-assisted feeder. Its ABS body holds 0.9 liters, and the included seed scoop helps with measured refills.
Choose it if you're comfortable following a model-specific cleaning routine and want to stay with Bird Buddy. Skip it if tool-free cleaning is your main buying requirement, since that feature isn't established here.
Setup needs a charged camera, Bluetooth pairing, and 2.4 GHz Wi-Fi. Check signal at a reachable mounting spot before committing to the location.
Bird Buddy separates free core functions from paid extras, so decide which app features matter before buying. See our Bird Buddy Pro Solar review for a closer look at the feeder.
Birdfy 60FPS Solar: for buyers who prioritize routine access
The Birdfy 60FPS Solar is the clearest choice here for tool-free cleaning access. Its design opens for routine care without complicated disassembly.
Its fir wood body holds 1.3 liters, while the side-mounted camera records 1080P footage and offers a high-frame-rate mode. Lifetime free AI identification suits buyers who want that feature without an ongoing AI subscription.
Choose it if easier opening is your priority and you're willing to follow wood-specific care directions. Skip it if you want an ABS feeder body or prefer 2K recording.
The camera's IP66 protection doesn't make the whole feeder suitable for immersion. Keep the wood body, camera, and built-in solar panel within their separate care limits.
NETVUE Birdfy 2K: for beginners who want free core viewing
The NETVUE Birdfy suits beginners who want automatic recording, live viewing, and sharing without paying for AI recognition. Its easy-to-clean body and easy-refill top support regular upkeep.
It holds up to 50 oz of seed and includes mounting tools for a pole, wall, or tree. Choose the position that gives you safe access rather than filling it high and placing it out of reach.
Pick it if free core viewing matters more than included solar charging. Skip it if you want a built-in solar roof or free AI recognition, since AI requires a subscription.
For a wider comparison, see our best bird feeder cameras.
What cleaning mistakes should you avoid?
Avoid topping up dirty seed, rushing drying, and treating every part as washable. These shortcuts leave residue behind or expose electronics to water.
Don't use a pressure washer, direct hose spray, dishwasher, or hot-water treatment unless the care instructions permit that method. Stubborn dirt calls for patient cleaning of approved parts, not stronger force.
Don't assume a full hopper needs less attention. Check underneath remaining seed, especially after rain, and empty it when cleaning is due.
Keep clean parts away from the dirty brush, waste bag, and old seed. Otherwise, you can transfer debris back onto surfaces you've just washed.
How do you dry and reassemble the feeder?
Let all washed parts dry completely in a clean, ventilated place. Spread them out on a rack or clean towel instead of stacking them together.
Inspect corners, seams, and recesses before reassembly. Avoid direct heat unless the manufacturer allows it, since forcing faster drying may damage parts.
Reinstall seals and hardware in the correct positions without overtightening. Add fresh, dry seed, secure the mount, and confirm the camera view and app connection before leaving the feeder.
For solar placement choices, our guide to solar bird feeder cameras explains the options.
What's the best decision for cleaning Bird Buddy?
If you're deciding how to clean Bird Buddy, keep your current feeder and build a repeatable care routine around its instructions. Store the brush, wash container, and care directions together so the next clean takes less preparation.
If you're buying, choose Bird Buddy Pro Solar for its camera and app features, Birdfy 60FPS Solar for tool-free access, or NETVUE Birdfy for free core viewing. In every case, a reachable mount and sensible seed fills make routine care easier.
After reassembly, revisit how to set up a bird feeder camera if you need to check placement or restore the connection.
Frequently asked questions
How often should you clean a Bird Buddy?
Follow Bird Buddy's cleaning schedule, and clean sooner when you find wet seed, droppings, or buildup during refills or after rain. Don't wait for mold or a bad smell, and discard spoiled seed rather than mixing it with a fresh batch.
Can you wash the Bird Buddy camera?
Keep the Bird Buddy camera out of the wash unless its care instructions approve a specific cleaning method for that component. Weather protection doesn't make soaking safe, so follow the camera-cleaning directions and keep water, cleaner, and wet tools away from charging ports and electrical connections.
What should you use to clean a smart bird feeder?
Use a soft brush or cloth and the washing products approved for your feeder's washable parts, followed by its approved disinfection method when directed. Follow the specified dilution, contact time, and rinsing instructions, and never mix cleaners or assume that soap alone disinfects a feeder.
Can you put the feeder back while it is damp?
Wait until all washed parts are completely dry before adding seed or reconnecting electronics, since moisture can remain in corners and seams. Let parts dry in a clean, ventilated place, then check hidden areas before reassembly and avoid direct heat unless the manufacturer allows it.